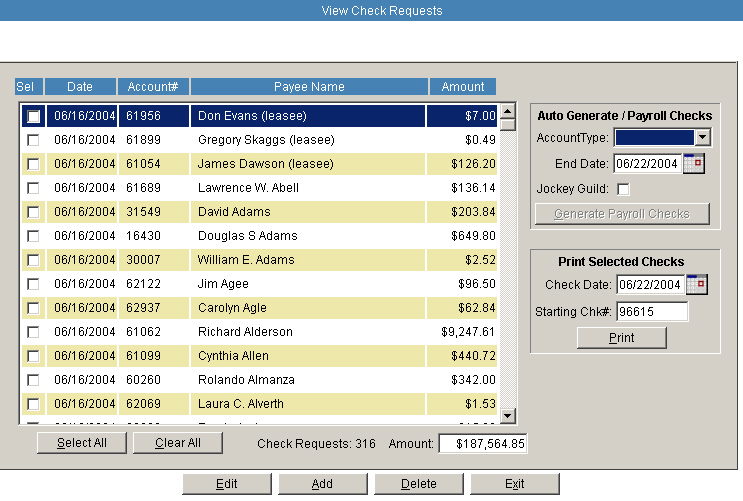
The Generate Checks process allows the user to manually enter individual check requests, or the system will generate multiple checks via the Auto Generate / Payroll Checks function. The system will set the Check Date to the current date, and generate the Starting Check number. Both of these fields can be edited by the user. The user can choose to have the checks sort in either alphabetical order, or in the sequence entered. To learn how to change the sort order of checks, go to Admin Maintenance/ Facility Configuration.
To generate a single check, click the ‘Add’ button. The system will go to the Check Request screen.
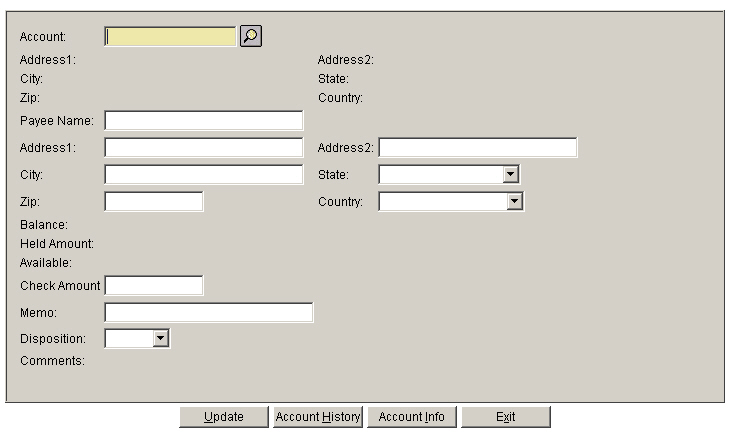
Account: Enter the account number or scan for the account by name.
Address 1 & 2: The address from the Horsemen Maintenance screen will be displayed.
Payee Name: There are two different ways the system will automatically populate the Payee name field. If the ‘Check Name’ field in the Horsemen Maintenance screen is ‘blank’, then the system will populate the Payee Name with the same name as the Account Name. If the system finds any data in the ‘Check Name’ field from the Horsemen Maintenance screen, the Check Name will appear in the Payee Name field. This name can be changed if the ‘Pay to the Order’ name on the check should be a name other than either of these two options. If so, type the new Payee name here.
Payee Address1 and Address2: The system will automatically enter the Address information as it appears on the Horsemen Maintenance Account Information screen. However, if the Payee name is modified, the system will delete the original Address information so the new Payee Address can be entered. The Payee name will also be displayed on the Check Register Report.
Balance/Held Amount/Available: Account Balance information will be displayed here.
Check Amount: The system will populate this field with the “available” balance in the account, and highlight the amount to make it easy to edit. If this is the amount of the check request, press <Tab> to go to the next field. If the amount of the check request is for an amount , enter the new amount and press <Tab>. Note: If the amount requested is a whole dollar amount, the decimal point and proceeding cents do not need to be entered. The system will automatically format the numbers into ‘Currency’.
Memo: Data entered here will print on the memo line of the check and check stubs.
Disposition: If the disposition method of the check is to appear on the check stub, choose from the choices in the dropdown menu. Available options for how the checks will be disposed of can be defined in the Admin Maintenance / Check Disposition table. Examples of available disposition codes are: Mail, Pickup, Fed-X.
Comments: Data entered in the Comments field of the Horsemen Maintenance Account Information Tab will be displayed here. This data will not print.
Update: The Update button processes the check request and validates all the information. If no problems are found, the check request will be added to the list of checks on the main generate check screen for printing, and a new, blank check request screen will appear ready for the next check request to be entered. However, if a problem with the check request is found, a warning message will be displayed. Here is an example of a warning message:
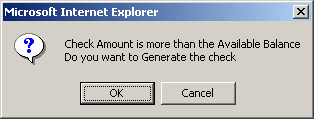
In the example above, the amount of the check request exceeded the total available amount in the account. The user has the ability to override the warning message and allow the check request to be processed, or to ‘Cancel’ the check request. The system will also check to see if the following information has been entered on the account in the Horsemen Maintenance screen: Social security / Federal ID number, or W-9 information on file. If any of this information is missing, another warning message will be displayed.
After all individual check requests have been entered, press the <Exit> button to return to the main Generate Check screen.